- Home
- Forever Fabulous
40th Birthday Card - Forever Fabulous
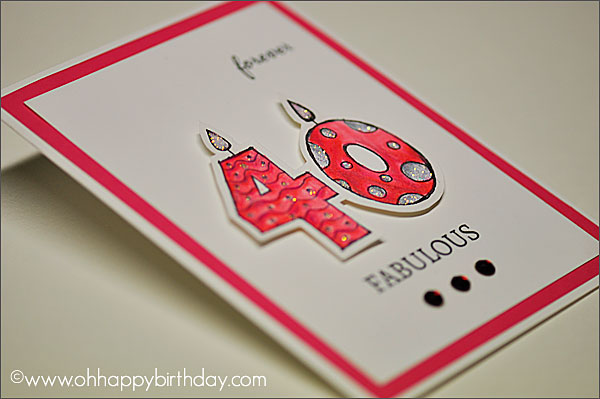
40th birthday cards do not need to be dull. In fact, this is the best time to add lots of bling bling and use brighter colours. For this birthday card, I decided to use a beautiful pink cardstock layered over a white blank card.
Not wanting the pink to be too overbearing, another piece of white card is layered over the pink leaving a narrow margin of about 0.5 cm.
Have a look at the finished Happy 40th Birthday card.
The photo above is not doing the card justice because the lighting is all wrong. It's supposed to be pink but here, it looks more red than pink:-0
Okay, this is how it's done.
Forever Fabulous 40th Birthday Card
Supplies Used:
1. 21cm x 13.5cm white card folded into half -> 10.5cm x 13.5cm
2. 10cm x 13cm pink card
3. A4 or letter size white card
4. 3 dark pink bling bling (gems)
5. glitter glue
6. glue or double-sided tape
7. double-sided foam tape
8. colored pencils (I use Prismacolor)
9. scissors
10. printer
11. trimmer for cutting card stock.
12. black fine marker
13. A4 or Letter size sheet of white card
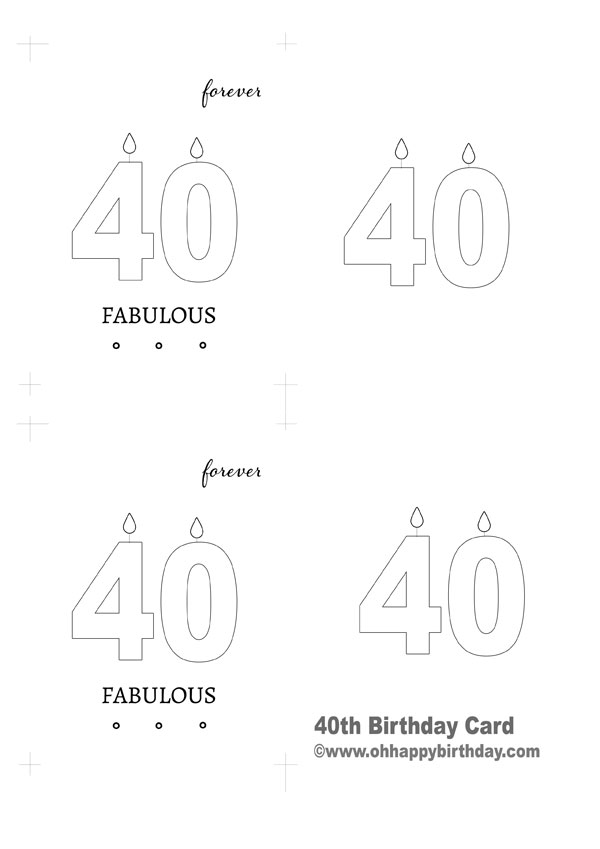
14. Card Template (zip) - you can make 2 cards (refer to diagram below) - the extra numbers are for layering on top to get a 3D effect.
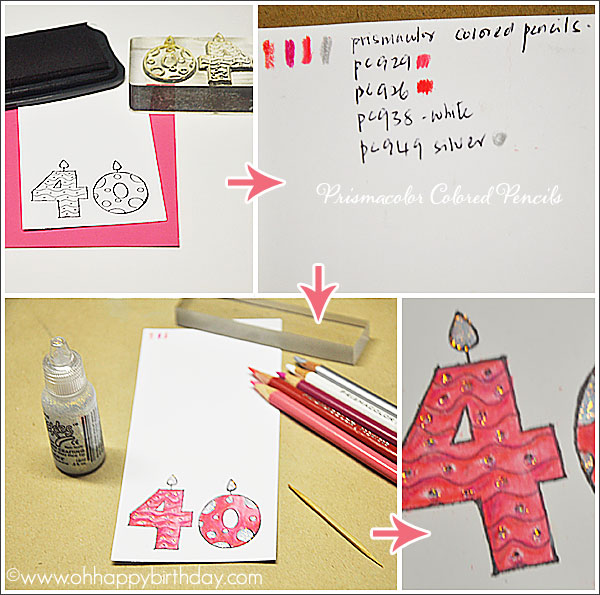
Use rubber stamps or die-cuts if you like, then you don't need to download and print the above template. That's what I did anyway. (Refer pix below)
Instructions:
1. Apply double-sided tape or glue to back of pink card and layer over white folded card leaving a narrow margin all around.
2. Download Birthday Card template and print onto a sheet of white cardstock.
For my card, I used two Hero Arts clear stamps to create the number '40' with Memento black ink. But for your convenience, I have created a template for you to download and print so you do not need to go looking for rubber stamps to make this greeting card.
3. Cut out the 9cm x 12cm design card.
4. Layer the 9cm x 12cm white printed card onto the pink card (refer step #1)
5. Doodle wavy lines inside the number '4' and circles inside '0'
6. Colour the number 40 with colored pencils and add glitter glue to candles and doodles inside '40'
7. Leave to dry thoroughly.
8. Trim around the number '40' with a pair of scissors.
9. Apply double-sided foam tape behind the number and paste over the number '40' on the white card for a 3D effect.
10. Add the deep pink gems on top of the 3 circles below the word FABULOUS.
If you don't have any gems to apply to the 3 circles below the word FABULOUS, just use a pink glitter glue or gel pen to colour inside the circles.
That's it! I hope you enjoy making this 40th Birthday Greeting card.
Do you know that reaching 40 is very unnerving for many women? Many stop counting once they reached 38th or 39th but to go beyond 40 - they think that that's for the brave ones.
I think we should not be too concerned about the number but rather celebrate each milestone in our lives with joy and confidence. What do you think? Are you one of those who cringe when age is discussed?
Please don't! You are special and I pray that people around you will make you feel so and when your next birthday comes around, that they will celebrate with you and make you feel so loved and real special whether you are 40 or beyond.
Maybe, these tips from Dr. Oz's website might help: Ageless Beauty: Looking Your Most Beautiful After 40 by celebrity makeup artist and beauty expert Cynde Watson.

New! Comments
Please let me know what you think about this birthday card and/or article? Leave me a comment in the box below.